Morning coffee: microarrays

kaffe_lissabon

Who still uses gene expression microarrays? I do and lots of other people do. And even though it’s pretty clear that RNA-seq is better, as long as it’s more expensive — and it probably still is for many combinations of microarray and sequencing platforms — the trade-off between the technical variability and sample size should still favour microarrays. But the breaking point probably occurs about right now, and I’m looking forward to seeing lots of sequencing based genetical genomics with splice-eQTL, antisense RNA-eQTL and what not! But then again, the same might happen for RNA-seq in a few years: I hope people stick with current generation massively parallel sequencing long enough to get decent sample sizes instead of jumping to small-N studies with the next technology.

Journal club of one: ”Short copy number variations potentially associated with tonic immobility response in newly hatched chicks”

(‘Journal club of one’ will be quick notes on papers, probably mostly about my favourite topics — genetics and the noble chicken.)

Abe, Nagao & Inoue-Murayama (2013), recently published this paper in PLOS ONE about copy number variants and tonic immobility in two kinds of domestic chicken. This obviously interests me for several reasons: I’m working on the genetic basis of some traits in the chicken; tonic immobility is a fun and strange behaviour — how it works and if it has any adaptive importance is pretty much unknown, but it is a classic from the chicken literature — and the authors use QTL regions derived directly from the F2 generation of cross that I’m working on — we’ve published one paper so far on the F8 generation.

Results: They use arrays and qPCR to search for copy number variants in three regions on chromosome one in two breeds (White Leghorn and Nagoya, a Japanese breed). After quite a bit of filtering they end up with a few variants that differ between the breeds. The breeds also differ in their tonic immobility behaviour with Leghorns going into tonic immobility after three attempts on average and lying still for 75 s and Nagoya taking 4.5 attempts and lying for 100 s on average. But the copy number variants were not associated with tonic immobility attempts or duration within breeds, so there is not really any evidence that they affect tonic immobility behaviour.

Comments:

Apart from the issue that the regions (more than 60 Mb) will contain lots of other variants, we do not know whether these regions affect tonic immobility behaviour in these breeds in the first place. The intercross that the QTL come from is a wild by domestic Red Junglefowl x White Leghorn cross, and while Nagoya seem a very interesting breed that is distant from White Leghorn they are not junglefowl. When it comes to the Leghorn side of the experiments, I wouldn’t be surprised White Leghorn bred on a Swedish research institute and a Japanese research institute differed quite a bit. The breed differences in tonic immobility is not necessarily due to the genetic variants identified in this particular cross, especially since behaviour is probably very polygenic, and an F2 QTL study by necessity only scratches the surface.

In the discussion the authors bring up power: There were 71 Nagoya and 39 White Leghorn individuals and the experiment might be unable to reliably detect associations within the breeds. That does seem likely, but making a good informed guess about the expected effect is not so easy. A hint could come from looking at the effect sizes in the QTL study, but there is no guarantee that genetic background will not affect them. I don’t know really what this calculation comes from: ”Sample sizes would need to be increased more than 20-fold over the current study design” — maybe 11 tested copy number variants times two breeds? To me, that seems both overly optimistic, because it assumes that the entire breed difference would be due to these three QTL on chromosome 1, and overly pessimistic, since it assumes that the three QTL would fractionate into 11 variants.

Finally, with all diversity in the chicken, there’s certainly a place both for within and between population studies of various chickens with all kinds of genomic! Comparing breeds with different selection histories should be very interesting for distinguishing early ‘domestication QTL’ from ‘productivity QTL’ selected under modern chicken breeding. And I wish somebody would figure out a little more about how tonic immobility works.

Literature

Abe H, Nagao K, Inoue-Murayama M (2013) Short Copy Number Variations Potentially Associated with Tonic Immobility Responses in Newly Hatched Chicks. PLoS ONE 8(11): e80205. doi:10.1371/journal.pone.0080205

Fall is the data analysis season

fall

Dear diary,

I spent a lot of my summer in the lab, and my fall has been mostly data analysis, with a little writing and a couple of courses thrown in there. Data analysis means writing code, and nowadays I do most of my work with the help of R. R has even replaced python and perl for most ad hoc scripting. Case in point: I recently wrote an R script to generate and run a (long) series of tar commands for me. It might sound weird, but R can do these silly tasks just as well as any scripting language and even when its statistical functions play no role, its tabular data structures often come in handy.

Working on multiple similar but not identical projects also means I’ve got to reread and rework some old scripts, and I often find that when return to reuse some piece code, I’ve learned enough to rewrite it in a better way. Inspired by this paper, I’m trying to slowly improve my programming practices. The assertthat package is a new friend, and the next step is getting better testing routines going, probably with the aid of testthat. (Speaking of learning R, did you know that you get the underscore sign in ESS by double tapping the key? Just pressing it once makes an assignment arrow. I didn’t realise until the other day and I feel very stupid for it.)

We’ve been running a second season of the introduction to R seminars with the lab, also including some gene expression and massively parallel resequencing data. (The latter not so much with R, though.) I’ve learned quite a bit, and hopefully refined my R teaching skills a little. I have the impression that doing lots of in-seminar exercises has been helpful, and this time around I put a lot more emphasis on organising analysis code into scripts.

I’ve also gotten to play a bit more with quantitative genetics models with MCMCglmm, which is great fun. Speaking of MCMC, Gelman & co’s Bayesian Data Analysis 3rd edition has come out! My copy is on its way, and I’ve also bought Dirk Edelbuettel’s Rcpp book. Looking forward to that.

During November, my blog hits set a new record (almost doubling the previous most visited month), thanks to links from Matt Asher’s Probability and statistics blog and Sam Clifford’s blog . It’s very flattering to be linked by two statistics bloggers that I’ve read, one of which was already in my RSS reader.

By the way, I will be at the Evolution in Sweden meeting in Uppsala in January. If you’re there, say hi!

Morning coffee: pleiotropy

kaffekatt

In the simplest terms pleiotropy means genetic side-effects: a pleiotropic gene is a gene that does several things and a pleiotropic variant is a variant that makes its carrier different from carriers of other variants in more than one trait. It’s just that the words ‘gene’ , ‘trait’ and ‘different’ are somewhat ambiguous. Paaby & Rockman (2013) have written a nice analytical review about the meaning of pleiotropy. In their terminology, molecular gene pleiotropy is when the product of a gene is involved in more than one biological process. Developmental pleiotropy, on the other hand, deals with genetic variants: a variant is developmentally pleiotropic if it affects more than one trait. This is the sense of the word I’d normally think of. Third, selectional pleiotropy is deals with variants that affect several aspects of fitness, possibly differently for different individuals.

Imagine that we have found a variant associated with two variables. Have we got a pleiotropic variant on our hands? If the variables are just different measures of the same thing, clearly we’re dealing with one trait. But imagine that the variables are actually driven by largely different factors. They might respond to different environmental stimuli and have mostly separate genetic architectures. If so, we have two different traits and a pleiotropic variant affecting both. My point is that it depends on the actual functional relationship between the traits. Without knowing something about how the organism works we can’t count traits. With that in mind, it seems very bold to say things about variants in general and traits in general. Paaby & Rockman’s conclusion seems to be that genetic mapping is not the way to go, because of low power to detect variants of small effect, and instead they bring up alternative statistical and quantitative genetics methods to demonstrate pleiotropy on a large scale. I agree that these results reinforce that pleiotropy must be important, in some sense of the word. But I think the opposite approach still has value: the way to figure out how important pleiotropy is for any given suite of traits is to study them mechanistically.

(Zombie kitty by Anna Nygren.)

Bracketing part of a dna sequence in Javascript

Sometimes you just need a quick script to make life easier. This is an example of a small task: You have a dna sequence extracted from some bigger corpus, such as a reference genome sequence, and you know that there is something interesting going on 200 bp into the sequence. So you’ve downloaded a fasta file, and you want the computer to count 200 bases of flanking sequence and highlight the interesting thing for you. This problem arises naturally when designing primers, for example. You can use any scripting language you want, but if you want it to be used by a person who does not (yet) use command line based tools, if you’d like it to run on their computer that runs a different operating system than yours does, and if want to make a graphical user interface as quickly as possible — Javascript is actually an excellent weapon of choice.

Therefore, the other day, I wrote this little thing in Javascript. Mind you, it was ages since I last touched Javascript or html, and it’s certainly not a thing of beauty. But it does save time and I think I’ve avoided the most egregious errors. Everything is contained in the html page, so it’s actually a small bioinformatics script that runs in the browser.

Here is the Javascript part: a single procedure that extracts the parameters (the sequence and the number of flanking bases before and after), uses regular expressions to remove any fasta header, whitespaces and newlines, slices the resulting cleaned sequence up in three pieces, and outputs it with some extra numbers.

function bracketSequence (form) {
   var before = form.flank_before.value;
   var after = form.flank_after.value;
   var seq = form.sequence.value;

   // Find and remove fasta header
   fastaHeader = seq.match(/^>.*[\r\n|\n|\r]/, "");
   seq = seq.replace(/(^>.*(\r\n|\n|\r))/, "");

   // Remove whitespace and newlines
   seq = seq.replace(/(\r\n|\n|\r| )/gm, "");

   seqBefore = seq.slice(0, before);
   seqCore = seq.slice(before, seq.length - after);
   seqAfter = seq.slice(seq.length - after, seq.length);
   form.output.value = seqBefore + "[" + seqCore + "]" + seqAfter;

   form.fasta_header.value = fastaHeader;

   document.getElementById("core_length").innerHTML = seqCore.length;
   document.getElementById("before_length").innerHTML = seqBefore.length;
   document.getElementById("after_length").innerHTML = seqAfter.length;
}

I know, I know — the regular expressions look like emoticons that suffered through a serious accident. The fasta header expression ”^>.*[\r\n|\n|\r]/” matches the beginning of the file up to any linebreak character. The other expression ”(\r\n|\n|\r| )” just matches linebreaks and whitespace. This means the fasta header has to start with the ”>”; it cannot have any whitespace before. Other than whitespace, strange characters in the sequence should be preserved and counted.

The input and output uses a html form and a couple of named pieces of html (‘spans’). Here we put two textboxes to input the numbers, a big textarea for the sequence, and then a textarea, a textbox and some spans for the output. The onClick action of the button runs the procedure.

<form name="form" action="" method="get">

<p>Flanking bases before: <input type="text" name="flank_before"
value="" /></p>

<p>Flanking bases after: <input type="text" name="flank_after"
value="" /></p>

<p>Your sequence:</p>

<textarea name="sequence" rows="5" cols="80">
</textarea>

<p><input type="button" name="button" value="Go"
onClick="bracketSequence(this.form)" /></p>

<p>Output sequence:</p>

<textarea name="output" rows="5" cols="80">
</textarea>

<p>Fasta header: <input type="text" name="fasta_header" value="" /></p>

<p>Length of core sequence: <span id="core_length"></span></p>
<p>Length of flank before: <span id="before_length"></span></p>
<p>Length of flank after: <span id="after_length"></span></p>

</form>

Morning coffee: alpha level 0.005

kaffe

Valen Johnson recently published a paper in PNAS about Bayes factors and p-values. In null hypothesis testing p-values measure the probability of seeing data this extreme or more extreme, if the null hypothesis is true. Bayes factors measures the ratio between the posterior probability of the alternative hypothesis to the posterior probability of the null hypothesis. The words ‘probability of the hypothesis’ tells us we’re in Bayes land, but of course, that posterior probability comes from combining the prior probability with the likelihood, which is the probability of generating the data under the hypothesis. So the Bayes factor considers not only what happens if the null is true, but what happens if the alternative is true. That is one source of discrepancies between them. Johnson has found a way to construct Bayes factors so that they correspond certain common hypothesis tests (including an approximation for the t-test, so there goes most of biology), and found for many realistic test situations a p-value of 0.05 corresponds to pretty weak support in terms of Bayes factors. Therefore, he suggests the alpha level of hypothesis tests should be reduced to at least 0.005. I don’t know enough about Bayes factors to really appreciate Johnson’s analysis. However, I do know that some responses to the paper make things seem a bit too easy. Johnson writes:

Of course, there are costs associated with raising the bar for statistical significance. To achieve 80% power in detecting a standardized effect size of 0.3 on a normal mean, for instance, decreasing the threshold for significance from 0.05 to 0.005 requires an increase in sample size from 69 to 130 in experimental designs. To obtain a highly significant result, the sample size of a design must be increased from 112 to 172.

If one does not also increase the sample sizes to preserve — or, I guess, preferably improve — power, just reducing the alpha level to 0.005 will only make matters worse. With low power comes, as Andrew Gelman likes to put it, high Type M or magnitude error rate. That is if power is bad enough not only will there be few significant findings, but all of them will be overestimates.

Using R: Coloured sizeplot with ggplot2

Someone asked about this and I though the solution with ggplot2 was pretty neat. Imagine that you have a scatterplot with some points in the exact same coordinates, and to reduce overplotting you want to have the size of the dot indicating the number of data points that fall on it. At the same time you want to colour the points according to some categorical variable.

The sizeplot function in the plotrix package makes this type of scatterplot. However, it doesn’t do the colouring easily. I’m sure it’s quite possible with a better knowledge of base graphics, but I tend to prefer ggplot2. To construct the same type of plot we need to count the data points. For this, I use table( ), and then melt the contingency table and remove the zeroes.

library(ggplot2)
library(reshape2)
data <- data.frame(x=c(0, 0, 0, 0, 1, 1, 2, 2, 3, 3, 4, 4),
                   y=c(0, 0, 0, 3, 1, 1, 1, 2, 2, 1, 4, 4),
                   group=c(rep(1, 6), rep(2, 4), rep(3, 2)))
counts <- melt(table(data[1:2]))
colnames(counts) <- c(colnames(data)[1:2], "count")
counts <- subset(counts, count != 0)
sizeplot <- qplot(x=x, y=y, size=count, data=counts) + scale_size(range=c(5, 10))

scaleplot_1

This is the first sizeplot. (The original scale makes single points very tiny. Hence the custom scale for size. Play with the range values to taste!) To add colour, we merge the counts with the original data to get back the group information — and, in true ggplot2 fashion, map the group variable to colour.

counts.and.groups <- merge(counts, unique(data))
sizeplot.colour <- qplot(x=x, y=y, size=count,
                         colour=factor(group), data=counts.and.groups) +
                     scale_size(range=c(5, 10))

sizeplot_2

One thing that this simple script does not handle well is if points that should have different colour happen to overlap. (As it stands, this code will actually plot two points both the size of the total number of overlapping points in different colours on top of each other. That must be wrong in several ways.) However, I don’t know what would be the best behaviour in this instance. Maybe to count the number of overlaps separately and plot both points while adding some transparency to the points?

Morning coffee: tables

(Note: ‘Morning coffee’ will be short musings about science-related topics.)

coffee

I don’t like tables. Or, more precisely: I don’t like tables that I have to read, but I love telling my computer to read tables for me. Tables made for human eyes tend to have certain features — I don’t know whether they really help facilitate human understanding, but people seem to think they do — such as merged cells or omission of repeated values, footnotes indicated by superscript symbols and sometimes colouring that conveys meaning. There is a conflict between keeping the number of columns small enough to be readable and putting in all the statistics that readers want. Someone might want the coefficient of determination while someone who of information theoretic persuasion wants the AIC. It is more convenient for the human reader to see the table close to the text, while the computer user would probably like it in a text file. Some journals do this almost right: right below the table there is a link to download it as comma separated values. I think ideally any data would be presented as a summary table — or even better a graph! — and the underlying computer-readable data would be the click of a link away.

A slightly different introduction to R, part V: plotting and simulating linear models

In the last episode (which was quite some time ago) we looked into comparisons of means with linear models. This time, let’s visualise some linear models with ggplot2, and practice another useful R skill, namely how to simulate data from known models. While doing this, we’ll learn some more about the layered structure of a ggplot2 plot, and some useful thing about the lm function.

11. Using points, lines and error bars to show predictions from linear models

Return to the model of comb gnome mass at time zero. We’ve already plotted the coefficient estimates, but let us just look at them with the coef() function. Here the intercept term is the mean for green comb gnomes subjected to the control treatment. The ‘grouppink’ and ‘treatmentpixies’ coefficients are the mean differences of pink comb gnomes and comb gnomes exposed to pixies from this baseline condition. This way of assigning coefficients is called dummy coding and is the default in R.

model <- lm(mass0 ~ group + treatment, data)
coef(model)[1]
    (Intercept)       grouppink treatmentpixies 
      141.56771       -49.75414        23.52428

The estimate for a pink comb gnome with pixies is:

coef(model)[1] + coef(model)[2] + coef(model)[3]

There are alternative codings (”contrasts”) that you can use. A common one in Anova is to use the intercept as the grand mean and the coefficients as deviations from the mean. (So that the coefficients for different levels of the same factor sum to zero.) We can get this setting in R by changing the contrasts option, and then rerun the model. However, whether the coefficients are easily interpretable or not, they still lead to the same means, and we can always calculate the values of the combinations of levels that interest us.

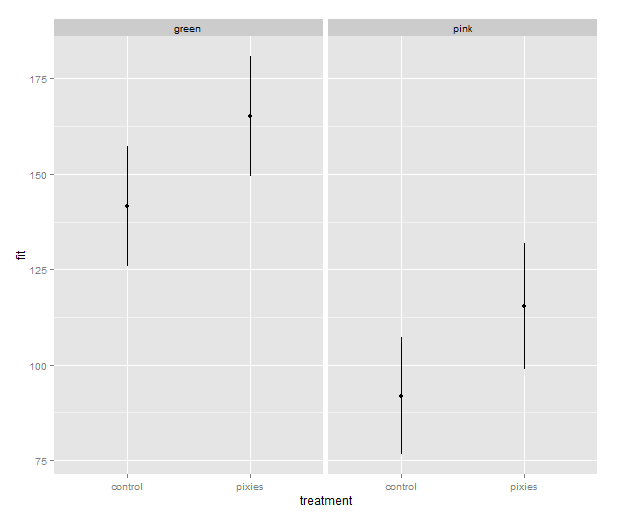
Instead of typing in the formulas ourself as above, we can get predictions from the model with the predict( ) function. We need a data frame of the new values to predict, which in this case means one row for each combination of the levels of group and treatment. Since we have too levels each there are only for of them, but in general we can use the expand.grid( ) function to generate all possible factor levels. We’ll then get the predictions and their confidence intervals, and bundle everything together to one handy data frame.

levels <- expand.grid(group=c("green", "pink"), treatment=c("control", "pixies"))
predictions <- predict(model, levels, interval="confidence")
predicted.data <- cbind(levels, predictions)
  group treatment       fit       lwr      upr
1 green   control 141.56771 125.82527 157.3101
2  pink   control  91.81357  76.48329 107.1439
3 green    pixies 165.09199 149.34955 180.8344
4  pink    pixies 115.33785  98.93425 131.7414

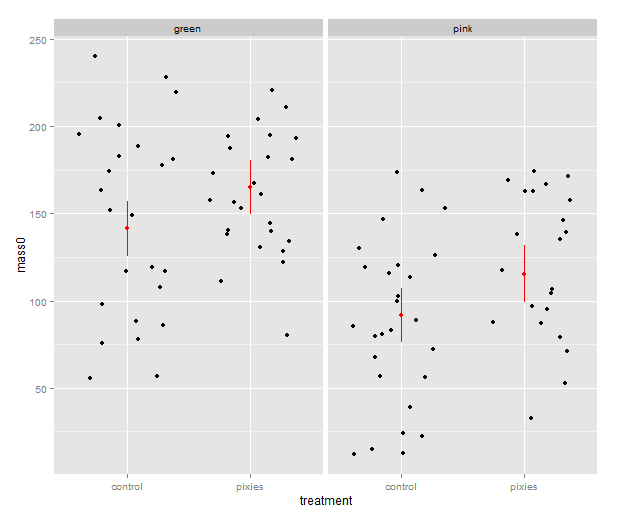
Now that we have these intervals in a data frame we can plot them just like we would any other values. Back in part II, we put several categorical variables into the same plot by colouring the points. Now, let’s introduce nice feature of ggplot2: making small multiples with faceting. qplot( ) takes facets argument which is a formula where the left hand side, before the tilde (‘~’), will be used to split the plot vertically, and the right hand side will split the plot horizontally. In this case, we split horizontally, each panel representing one level of the treatment variable. Also, we use a new geometry: pointrange, which draws a point with bars above and below it and is quite suitable for the intervals we’ve got.

qplot(x=treatment, facets=~group,
      y=fit, ymax=upr, ymin=lwr
      geom="pointrange", data=predicted.data)

model_lineranges

That’s good, but combining the predictions from the model and the actual data in the same plot would be nice. In ggplot2, every plot is an object that can be saved away to a variable. Then we can use the addition operator to add layers to the plot. Let’s make a jittered dotplot like the above and then add a layer with the pointrange geometry displaying confidence intervals. The scatter of the data points around the confidence intervals reminds us that there is quite a bit of residual variance. The coefficient of determination, as seen in the summary earlier, was about 0.25.

qplot(x=treatment, y=mass0, facets=~group, geom="jitter", data=data) +
    geom_pointrange(aes(y=fit, ymax=upr, ymin=lwr), colour="red", data=predicted.data)

model_jitter

In the above, we make use of ggplot2’s more advanced syntax for specifying plots. The addition operator adds layers. The first layer can be set up with qplot(), but the following layers are made with their respective functions. Mapping from variables to features of the plot, called aesthetics, have to be put inside the aes() function. This might look a bit weird in the beginning, but it has its internal logic — all this is described in Hadley Wickham’s ggplot2 book.

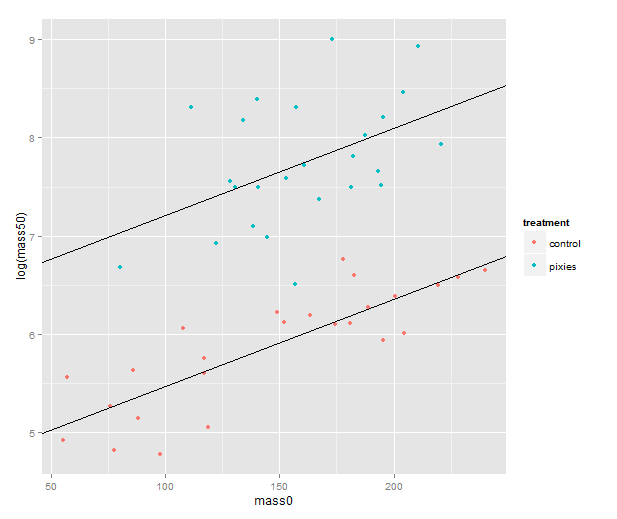
We should probably try a regression line as well. The abline geometry allows us to plot a line with given intercept and slope, i.e. the coefficients of a simple regression. Let us simplify a little and look at the mass at time zero and the log-transformed mass at time 50 in only the green group. We make a linear model that uses the same slope for both treatments and a treatment-specific intercept. (Exercise for the reader: look at the coefficients with coef( ) and verify that I’ve pulled out the intercepts and slope correctly.) Finally, we plot the points with qplot and add the lines one layer at the time.

green.data <- subset(data, group=="green")
model.green <- lm(log(mass50) ~ mass0 + treatment, green.data)
intercept.control <- coef(model.green)[1]
intercept.pixies <- coef(model.green)[1]+coef(model.green)[3]
qplot(x=mass0, y=log(mass50), colour=treatment, data=green.data) +
   geom_abline(intercept=intercept.pixies, slope=coef(model.green)[2]) +
   geom_abline(intercept=intercept.control, slope=coef(model.green)[2])

regression_lines

12. Using pseudorandom numbers for sanity checking

There is a short step from playing with regression functions that we’ve fitted, like we did above, to making up hypothetical regression functions and simulating data from them. This type of fake-data simulation is very useful to for testing how designs and estimation procedures behave and check things like the control of false positive rate and the power to accurately estimate a known model.

The model will be the simplest possible: a single categorical predictor with only two levels and normally distributed equal error variance, i.e. a t-test. There is a formula for the power of the t-test and an R function, power.t.test( ), that calculates it for us without the need for simulation. However, a nice thing about R is that we can pretty easily replace the t-test with more complex procedures. Any model fitting process that you can program in R can be bundled into a function and applied to pseudorandom simulated data. In the next episode we will go into how to make functions and apply them repeatedly.

Let us start out with a no effect model: 50 observations in two groups drawn from the same distribution. We use the mean and variance of the green control group. This first part just sets up the variables:

mu <- mean(subset(data, group=="green" & treatment=="control")$mass0)
sigma <- sd(subset(data, group=="green" & treatment=="control")$mass0)
treatment <- c(rep(1, 50), rep(0, 50))

The rnorm( ) function generates numbers from a normal distribution with specified mean and standard deviation. Apart from drawing numbers from it, R can of course pull out various table values, and it knows other distributions as well. Look at the documentation in ?distributions. Finally we perform a t-test. Most of the time, it should not show a significant effect, but sometimes it will.

sim.null <- rnorm(100, mu, sigma)
t.test(sim.null ~ treatment)$p.value

We can use the replicate( ) function to evaluate an expression multiple times. We put the simulation and t-test together into one expression, rinse and repeat. Finally, we check how many of the 1000 replicates gave a p-value below 0.05. Of course, it will be approximately 5% of them.

sim.p <- replicate(1000, t.test(rnorm(100, mu, sigma) ~ treatment)$p.value)
length(which(sim.p < 0.05))/1000
[1] 0.047

Let us add an effect! Say we’re interested in an effect that we expect to be approximately half the difference between the green and pink comb gnomes:

d <- mean(subset(data, group=="green" & treatment=="control")$mass0) -
     mean(subset(data, group=="pink" & treatment=="control")$mass0)
sim.p.effect <- replicate(1000, t.test(treatment * d/2 +
                                       rnorm(100, mu, sigma) ~ treatment)$p.value)
length(which(sim.p.effect < 0.05))/1000
[1] 0.737

We see that with 50 individuals in each group and this effect size we will detect a significant difference about 75% of the time. This is the power of the test. If you are able to find nice and trustworthy prior information about the kind of effect sizes and variances you expect to find in a study, design analysis allows you to calculate for instance how big a sample you need to have good power. Simulation can also give you an idea of how badly a statistical procedure will break if the assumptions don’t hold. We can try to simulate a situation where the variances of the two groups differs quite a bit.

sim.unequal <- replicate(1000, t.test(c(rnorm(50, mu, sigma),
                                        rnorm(50, mu, 2*sigma)) ~ treatment)$p.value)
length(which(sim.unequal < 0.05))/1000
[1] 0.043
sim.unequal.effect <- replicate(1000, t.test(c(rnorm(50, mu+d/2, sigma),
                                               rnorm(50, mu, 2*sigma)) ~ treatment)$p.value)
length(which(sim.unequal.effect < 0.05))/1000
[1] 0.373

In conclusion, the significance is still under control, but the power has dropped to about 40%. I hope that has given a small taste of how simulation can help with figuring out what is going on in our favourite statistical procedures. Have fun!

R intro seminars, take 2: some slides about data frames, linear models and statistical graphics

I am doing a second installment of the lunch seminars about data analysis with R for the members of the Wright lab. It’s pretty much the same material as before — data frames, linear models and some plots with ggplot2 — but I’ve sprinkled in some more exercises during the seminars. I’ve tried emphasising scripting a bit more than last time, and made a lot of use of RStudio. Going through this first part has taken four hours, but that includes each seminar a quick review of what we did last time and lots of questions. Next week we’ll get started on gene expression microarray data, and I’ll try introducing both limma and plyr.

(My previous introduction materials are posted here. Comments, suggestions and ideas about teaching R to biologists are always welcome!)