Using R: plyr to purrr, part 1

This is the second post about my journey towards writing more modern Tidyverse-style R code; here is the previous one. We will look at the common case of taking subset of data out of a data frame, making some complex R object from them, and then extracting summaries from those objects.

More nostalgia about plyr

I miss the plyr package. Especially ddply, ldply, and dlply, my favourite trio of R functions of all times. Yes, the contemporary Tidyverse package dplyr is fast and neat. And those plyr functions operating on arrays were maybe overkill; I seldom used them. But plyr was so smooth, so beautiful, and — after you’ve bashed your head against it for some time and it changed your mind — so intuitive. The package still exists, but it’s retired, and we shouldn’t keep writing R code like it’s 2009, should we?

I used to like to do something like this: take a data frame, push it through a function that returns some complex object, store those objects in a list, and then map various functions over that list to extract the parts I care about. What is the equivalent in the new idiom? To do the same thing but with the purrr package, of course! purrr replaces the list-centric parts of plyr, while dplyr covers data frame-centric summarisation, mutation and so on.

For this example we will be using the lm function on subsets of data and store the model object. It’s the simple case that everyone reaches for to demonstrate these features, but it’s a bit dubious. If you find yourself fitting a lot of linear models to subsets, maybe there are other models you should think about Especially here, when the fake data just happens to come from a multilevel model with varying intercepts … But in this case, let’s simulate a simple linear regression and look at the coefficients we get out.

set.seed(20210807)

n_groups <- 10
group_sizes <- rpois(n_groups, 10)
n <- sum(group_sizes)

fake_data <- tibble(id = 1:n,
                    group = rep(1:n_groups,
                                times = group_sizes),
                    predictor = runif(n, 0, 1))
group_intercept <- rnorm(n_groups, 0, 1)

fake_data$response <- fake_data$predictor * 10 +
  group_intercept[fake_data$group] +
  rnorm(n)

And here is the plyr code: First, dlply takes us from a data frame, splitting it by group, to a list of linear models. Then, ldply takes us from the list of models to a data frame of coefficients. tidy is a function from the wonderful broom package which extracts the same information as you would get in the rather unwieldy object from summary(lm), but as a data frame.

library(plyr)
library(broom)

fit_model <- function(data) {
  lm(response ~ predictor, data)
}

models <- dlply(fake_data,
                     "group",
                     fit_model)
result <- ldply(models, tidy)

This is what the results might looks like. Notice how ldply adds the split labels nicely into the group column, so we know which rows came from which subset.

   group        term   estimate std.error  statistic      p.value
1      1 (Intercept) -0.2519167 0.5757214 -0.4375670 6.732729e-01
2      1   predictor 10.6136902 1.0051490 10.5593207 5.645878e-06
3      2 (Intercept)  3.1528489 0.6365294  4.9531864 7.878498e-04
4      2   predictor  8.2075766 1.1458702  7.1627452 5.292586e-05
5      3 (Intercept) -0.8103777 0.6901212 -1.1742542 2.786901e-01
...

split/map: The modern synthesis

If we pull out purrr, we can get the exact same table like so. The one difference is that we get a tibble (that is, a contemporary, more well-behaved data frame) out of it instead of a base R data.frame.

library(purrr)

models <- map(split(fake_data,
                    fake_data$group),
                    fit_model)
result <- map_df(models,
                 tidy,
                 .id = "group")
# A tibble: 80 x 6
   group term        estimate std.error statistic  p.value
                            
 1 1     (Intercept)     1.67     0.773      2.16 6.32e- 2
 2 1     predictor       8.67     1.36       6.39 2.12e- 4
 3 2     (Intercept)     4.11     0.566      7.26 4.75e- 5
 4 2     predictor       8.19     1.11       7.36 4.30e- 5
 5 3     (Intercept)    -7.50     0.952     -7.89 9.99e- 5
 6 3     predictor      11.5      1.75       6.60 3.03e- 4
 7 4     (Intercept)   -19.8      0.540    -36.7  7.32e-13
 8 4     predictor      11.5      0.896     12.8  5.90e- 8
 9 5     (Intercept)   -12.4      1.03     -12.0  7.51e- 7
10 5     predictor       9.69     1.82       5.34 4.71e- 4
# … with 70 more rows

First, the base function split lets us break the data into subsets based on the values of a variable, which in this case is our group variable. The output of this function is a list of data frames, one for each group.

Second, we use map to apply a function to each element of that list. The function is the same modelling function that we used above, which shoves the data into lm. We now have our list of linear models.

Third, we apply the tidy function to each element of that list of models. Because we want the result to be one single data frame consolidating the output from each element, we use map_df, which will combine the results for us. (If we’d just use map again, we would get a list of data frames.) The .id argument tells map to add the group column that indicates what element of the list of models each row comes from. We want this to be able to identify the coefficients.

If we want to be fancy, we can express with the Tidyverse-related pipe and dot notation:

library(magrittr)

result <- fake_data %>%
  split(.$group) %>%
  map(fit_model) %>%
  map_df(tidy, .id = "group")

Nesting data into list columns

This (minus the pipes) is where I am at in most of my R code nowadays: split with split, apply with map and combine with map_dfr. This works well and looks neater than the lapply/Reduce solution discussed in part 0.

We can push it a step further, though. Why take the linear model out of the data frame, away from its group labels any potential group-level covariates — isn’t that just inviting some kind of mix-up of the elements? With list columns, we could store the groups in a data frame, keeping the data subsets and any R objects we generate from them together. (See Wickham’s & Grolemund’s R for Data Science for a deeper case study of this idea.)

library(dplyr)
library(tidyr)

fake_data_nested <- nest(group_by(fake_data, group),
                         data = c(id, predictor, response))

fake_data_models <- mutate(fake_data_nested,
                           model = map(data,
                                       fit_model),
                           estimates = map(model,
                                           tidy))

result <- unnest(fake_data_models, estimates)

First, we use the nest function to create a data frame where each row is a group, and the ”data” column contains the data for that subset.

Then, we add two list columns to that data frame: our list of models, and then our list of data frames with the coefficients.

Finally, we extract the estimates into a new data frame with unnest. The result is the same data frame of coefficients and statistics, also carrying along the data subsets, linear models and coefficents.

The same code with pipes:

fake_data %>% 
  group_by(group) %>% 
  nest(data = c(id, predictor, response)) %>% 
  mutate(model = map(data, fit_model),
         estimates = map(model, tidy)) %>% 
  unnest(estimates) -> ## right way assignment just for kicks
  result

I’m still a list column sceptic, but I have to concede that this is pretty elegant. It gets the job done, it keeps objects that belong together together so that there is no risk of messing up the order, and it is not that much more verbose. I especially like that we can run the models and extract the coefficients in the same mutate call.

Coda: mixed model

Finally, I can’t resist comparing the separate linear models to a linear mixed model of all the data.

We use lme4 to fit a varying-intercept model, a model that puts the same coefficient on the slope between the response and predictor in each group, but allows the intercepts to vary between groups, assuming them to be drawn from the same normal distribution. We put the coefficients from the linear models fit in each group separately and the linear mixed model together in the same data frame to be able to plot them.

library(ggplot2)
library(lme4)

model <- lmer(response ~ (1|group) + predictor,
              fake_data)

lm_coef <- pivot_wider(result,
                       names_from = term,
                       values_from = estimate,
                       id_cols = group)

lmm_coef <- cbind(group = levels(model@flist$group),
                  coef(model)$group)

model_coef <- rbind(transform(lm_coef, model = "lm"),
                    transform(lmm_coef, model = "lmm"))

colnames(model_coef)[2] <- "intercept"

ggplot() +
  geom_point(aes(x = predictor,
                 y = response,
                 colour = factor(group)),
             data = fake_data) +
  geom_abline(aes(slope = predictor,
                  intercept = intercept,
                  colour = factor(group),
                  linetype = model),
              data = model_coef) +
  theme_bw() +
  theme(panel.grid = element_blank())

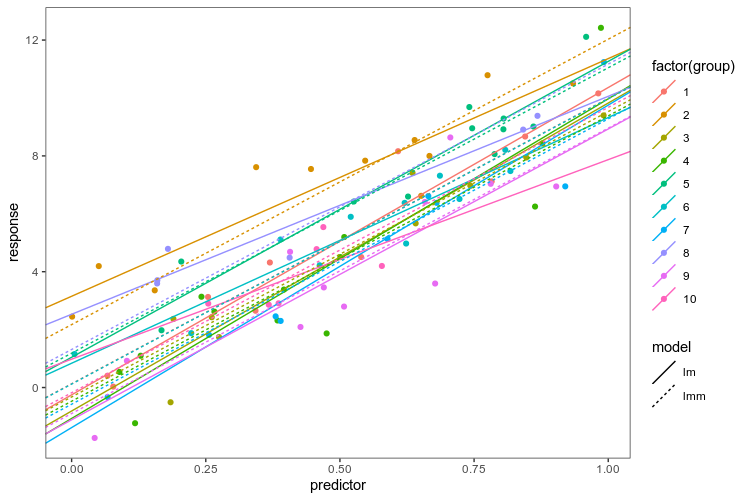
As advertised, the linear mixed model has the same slope in every group, and intercepts pulled closer to the mean. Now, we know that this is a good model for these fake data because we created them, and in the real world, that is obviously not the case … The point is: if we are going to fit a more complex model of the whole data, we want to be able to explore alternatives and plot them together with the data. Having elegant ways to transform data frames and summarise models at our disposal makes that process smoother.

Using R: 10 years with R

Yesterday, 29 Feburary 2020, was the 20th anniversary of the release R 1.0.0. Jozef Hajnala’s blog has a cute anniversary post with some trivia. I realised that it is also (not to the day, but to the year) my R anniversary.

I started using R in 2010, during my MSc project in Linköping. Daniel Nätt, who was a PhD student there at the time, was using it for gene expression and DNA methylation work. I think that was the reason he was pulled into R; he needed the Bioconductor packages for microarrays. He introduced me. Thanks, Daniel!

I think I must first have used it to do something with qPCR melting curves. I remember that I wrote some function to reshape/pivot data between long and wide format. It was probably an atrocity of nested loops and hard bracket indexing. Coming right from an undergraduate programme with courses using Ada and C++, even if we had also used Minitab for statistics and Matlab for engineering, I spoke R with a strong accent. At any rate, I was primed to think that doing my data analysis with code was a good idea, and jumped at the opportunity to learn a tool for it. Thanks, undergraduate programme!

I think the easiest thing to love about R is the package system. You can certainly end up in dependency hell with R and metaphorically shoot your own foot, especially on a shared high performance computing system. But I wouldn’t run into any of that until after several years. I was, and still am, impressed by how packages just worked, and could do almost anything. So, the Bioconductor packages were probably, indirectly, why I was introduced to R, and after that, my R story can be told in a series of packages. Thanks, CRAN!

The next package was R/qtl, that I relied on for my PhD. I had my own copy of the R/qtl book. For a period, I probably wrote thing every day:

library(qtl)

cross <- read.cross(file = "F8_geno_trim.csv", format = "csv")

R/qtl is one of my favourite pieces or research software, relatively friendly and with lots of documentation. Thanks, R/qtl developers!

Of course it was Dom Wright, who was my PhD supervisor, who introduced me to R/qtl, and I think it was also he who introduced me to ggplot2. At least he used it, and at some point we were together trying to fix the formatting of a graph, probably with some ugly hack. I decided to use ggplot2 as much as possible, and as it is wont to, ggplot2 made me care about rearranging data, thus leading to reshape2 and plyr. ”The magic is not in plotting the data but in tidying and rearranging the data for plotting.” After a while, most everything I wrote used the ddply function in some way. Thank you, Hadley Wickham!

Then came the contemporary tidyverse. For the longest time, I was uneasy with tidyr, and I’m still not a regular purrr user, but one can’t avoid loving dplyr. How much? My talk at the Swedish Bioinformatics Workshop in 2016 had a slide expressing my love of the filter function. It did not receive the cheers that the function deserves. Maybe the audience were Python users. With new file reading functions, new data frames and functions to manipulate data frames, modern R has become smoother and friendlier. Thanks, tidyverse developers!

The history of R on this blog started in 2011, originally as a way to make notes for myself or, ”a fellow user who’s trying to google his or her way to a solution”. This turned into a series of things to help teach R to biologists around me.

There was the Slightly different introduction to R series of blog posts. It used packages that feel somewhat outdated, and today, I don’t think there’s anything even slightly different about advocating RStudio, and teaching ggplot2 from the beginning.

This spawned a couple of seminars in course for PhD students, which were updated for the Wright lab computation lunches, and eventually turned into a course of its own given in 2017. It would be fun to update it and give it again.

The last few years, I’ve been using R for reasonably large genome datasets in a HPC environment, and gotten back to the beginnings, I guess, by using Bioconducor a lot more. However, the package that I think epitomises the last years of my R use is AlphaSimR, developed by colleagues in Edinburgh. It’s great to be able throw together a quick simulation to check how some feature of genetics behaves. AlphaSimR itself is also an example of how far the R/C++ integration has come with RCpp and RCppArmadillo. Thanks, Chris!

In summary, R is my tool of choice for almost anything. I hope we’ll still be using it, in new and interesting ways, in another ten years. Thank you, R core team!

Using R: from plyr to purrr, part 0 out of however many

This post is me thinking out loud about applying functions to vectors or lists and getting data frames back.

Using R is an ongoing process of finding nice ways to throw data frames, lists and model objects around. While tidyr has arrived at a comfortable way to reshape dataframes with pivot_longer and pivot_wider, I don’t always find the replacements for the good old plyr package as satisfying.

Here is an example of something I used to like to do with plyr. Don’t laugh!

Assume we have a number of text files, all in the same format, that we need to read and combine. This arises naturally if you run some kind of analysis where the dataset gets split into chunks, like in genetics, where chunks might be chromosomes.

## Generate vector of file names
files <- paste("data/chromosome", 1:20, ".txt", sep = "")

library(plyr)
library(readr)
genome <- ldply(files, read_tsv)

This gives us one big data frame, containing the rows from all those files.

If we want to move on from plyr, what are our options?

We can go old school with base R functions lapply and Reduce.

library(readr)

chromosomes <- lapply(files, read_tsv)
genome <- Reduce(rbind, chromosomes)

Here, we first let lapply read each file and store it in a list. Then we let Reduce fold the list with rbind, which binds the data frames in the list together, one below the other.

If that didn’t make sense, here it is again: lapply maps a function to each element of a vector or list, collecting the results in a list. Reduce folds the elements in a list together, using a function that takes in two arguments. The first argument will be the results it’s accumulated so far, and the second argument will be the next element of the list.

In the end, this leaves us, as with ldply, with one big data frame.

We can also use purrr‘s map_dfr. This seems to be the contemporary most elegant solution:

library(purrr)
library(readr)

genome <- map_dfr(files, read_tsv)

map_dfr, like good old ldply will map over a vector or list, and collect resulting data frames. The ”r” in the name means adding the next data frame as rows. There is also a ”c” version (map_dfc) for adding as columns.

Scripting for data analysis (with R)

Course materials (GitHub)

This was a PhD course given in the spring of 2017 at Linköping University. The course was organised by the graduate school Forum scientium and was aimed at people who might be interested in using R for data analysis. The materials developed from a part of a previous PhD course from a couple of years ago, an R tutorial given as part of the Behaviour genetics Masters course, and the Wright lab computation lunches.

Around twenty people attended the seminars, and a couple of handfuls of people completed the homeworks. I don’t know how much one should read into the course evaluation form, but the feedback was mostly positive. Some people had previous exposure to R, and did the first homework in an hour. Others had never programmed in any language, and had a hard time getting started.

There is certainly scope for improvement. For example, some of the packages used could be substituted for more contemporary tools. One could say that the course is slouching towards the tidyverse. But I worry a bit about making the participants feel too boxed in. I don’t want them to feel that they’re taught a way that will solve some anticipated type of problems very neatly, but that may not generalize. Once I’ve made the switch to dplyr and tidyr (and maybe even purr … though I hesitate) fully myself, I would probably use them in teaching too. Another nice plus would be to be able to use R for data science as course literature. The readings now are scattered; maybe a monolithic book would be good.

I’ve tried, in every iteration, to emphasize the importance of writing scripts, even when working interactively with R. I still think I need to emphasize it even more. There is also a kind of ”do as I say, not as I do” issue, since in the seminars, I demo some things by just typing them into the console. I’ll force myself to write them into a script instead.

Possible alternate flavours for the course include: A longer version expanding on the same topics. I don’t think one should cram more contents in. I’d like to have actual projects where the participants can analyze, visualize and present data and simulations.

This is the course plan we sent out:

1. A crash course in R

Why do data analysis with a scripting language
The RStudio interface
Using R as a calculator
Working interactively and writing code
Getting help
Reading and looking at data
Installing useful packages
A first graph with ggplot2

Homework for next time: The Unicorn Dataset, exercises in reading data, descriptive statistics, linear models and a few statistical graphs.

2. Programming for data analysis

Programming languages one may encounter in science
Common concepts and code examples
Data structures in R
Vectors
Data frames
Functions
Control flow

Homework for next time: The Unicorn Expression Dataset, exercises in data wrangling and more interesting graphs.

3. Working with moderately large data

Exercise followup
More about functions
Lists
Objects
Functional and imperative programming
Doing things many times, loops and plyr
Simulating data
Working on a cluster

Final homework: Design analysis by simulation: pick a data analysis project that you care about; simulate data based on a model and reasonable effect size; implement the data analysis; and apply it to simulated data with and without effects to estimate power and other design characteristics. This ties together skills from all seminars.

Using R: When using do in dplyr, don’t forget the dot

There will be a few posts about switching from plyr/reshape2 for data wrangling to the more contemporary dplyr/tidyr.

My most common use of plyr looked something like this: we take a data frame, split it by some column(s), and use an anonymous function to do something useful. The function takes a data frame and returns another data frame, both of which could very possibly have only one row. (If, in fact, it has to have only one row, I’d suggest an assert_that() call as the first line of the function.)

library(plyr)
results <- ddply(some_data, "key", function(x) {
  ## do something; return data.frame()
})

Or maybe, if I felt serious and thought the function would ever be used again, I’d write:

calculate <- function(x) {
  ## do something; return data.frame()
}
result <- ddply(some_data, "key", calculate)

Rinse and repeat over and over again. For me, discovering ddply was like discovering vectorization, but for data frames. Vectorization lets you think of operations on vectors, without having to think about their elements. ddply lets you think about operations on data frames, without having to think about rows and columns. It saves a lot of thinking.

The dplyr equivalent would be do(). It looks like this:

library(dplyr)
grouped <- group_by(some_data, key)
result <- do(grouped, calculate(.))

Or once again with magrittr:

library(magrittr)
some_data %>%
  group_by(key) %>%
  do(calculate(.)) -> result

(Yes, I used the assignment arrow from the left hand side to the right hand side. Roll your eyes all you want. I think it’s in keeping with the magrittr theme of reading from left to right.)

One important thing here, which got me at first: There has to be a dot! Just passing the function name, as one would have done with ddply, will not work:

grouped <- group_by(some_data, key)
## will not work: Error: Results are not data frames at positions ...
try(result <- do(grouped, calculate))

Don’t forget the dot!

Using R: quickly calculating summary statistics from a data frame

A colleague asked: I have a lot of data in a table and I’d like to pull out some summary statistics for different subgroups. Can R do this for me quickly?

Yes, there are several pretty convenient ways. I wrote about this in the recent post on the barplot, but as this is an important part of quickly getting something useful out of R, just like importing data, I’ll break it out into a post of its own. I will present a solution that uses the plyr and reshape2 packages. You can do the same with base R, and there’s nothing wrong with base R, but I find that plyr and reshape2 makes things convenient and easy to remember. The apply family of functions in base R does the same job as plyr, but with a slightly different interface. I strongly recommend beginners to begin with plyr or the apply functions, and not what I did initially, which was nested for loops and hard bracket indexing.

We’ll go through and see what the different parts do. First, simulate some data. Again, when you do this, you usually have a table already, and you can ignore the simulation code. Usually a well formed data frame will look something this: a table where each observation is a unit such as an individual, and each column gives the data about the individual. Here, we imagine two binary predictors (sex and treatment) and two continuous response variables.

data <- data.frame(sex = c(rep(1, 1000), rep(2, 1000)),
                   treatment = rep(c(1, 2), 1000),
                   response1 = rnorm(2000, 0, 1),
                   response2 = rnorm(2000, 0, 1))
head(data)
  sex treatment   response1   response2
1   1         1 -0.15668214 -0.13663012
2   1         2 -0.40934759 -0.07220426
3   1         1  0.07103731 -2.60549018
4   1         2  0.15113270  1.81803178
5   1         1  0.30836910  0.32596016
6   1         2 -1.41891407  1.12561812

Now, calculating a function of the response in some group is straightforward. Most R functions are vectorised by default and will accept a vector (that is, a column of a data frame). The subset function lets us pull out rows from the data frame based on a logical expression using the column names. Say that we want mean, standard deviation and a simple standard error of the mean. I will assume that we have no missing values. If you have, you can add na.rm=T to the function calls. And again, if you’ve got a more sophisticated model, these might not be the standard errors you want. Then pull them from the fitted model instead.

mean(subset(data, sex == 1 & treatment == 1)$response1)

sd(subset(data, sex == 1 & treatment == 1)$response1)

sd(subset(data, sex == 1 & treatment == 1)$response1)/
  sqrt(nrow(subset(data, sex == 1 & treatment == 1)))

Okay, but doing this for each combination of the predictors and responses is no fun and requires a lot of copying and pasting. Also, the above function calls are pretty messy with lots of repetition. There is a better way, and that’s where plyr and reshape2 come in. We load the packages. The first time you’ll have to run install.packages, as usual.

library(plyr)
library(reshape2)

First out, the melt function from rehape2. Look at the table above. It’s reasonable in many situations, but right now, it would be better if we put both the response variables in the same column. If it doesn’t seem so useful, trust me and see below. Melt will take all the columns except the ones we single out as id variables and put them in the same column. It makes sense to label each row with the sex and treatment of the individual. If we had an actual unit id column, it would go here as well:

melted <- melt(data, id.vars=c("sex", "treatment"))

The resulting ”melted” table looks like this. Instead of the response variables separately we get a column of values and a column indicating which variable the value comes from.

  sex treatment  variable       value
1   1         1 response1 -0.15668214
2   1         2 response1 -0.40934759
3   1         1 response1  0.07103731
4   1         2 response1  0.15113270
5   1         1 response1  0.30836910
6   1         2 response1 -1.41891407

Now it’s time to calculate the summary statistics again. We will use the same functions as above to do the actual calculations, but we’ll use plyr to automatically apply them to all the subsets we’re interested in. This is sometimes called the split-apply-combine approach: plyr will split the data frame into subsets, apply the function of our choice, and then collect the results for us. The first thing to notice is the function name. All the main plyr functions are called something with -ply. The letters stand for the input and return data type: ddply works on a data frame and returns a data frame. It’s probably the most important member of the family.

The arguments to ddply are the data frame to work on (melted), a vector of the column names to split on, and a function. The arguments after the function name are passed on to the function. Here we want to split in subsets for each sex, treatment and response variable. The function we apply is summarise, which makes a new data frame with named columns based on formulas, allowing us to use the column names of the input data frame in formulas. In effect it does exactly what the name says, summarises a data frame. And in this instance, we want to calculate the mean, standard deviation and standard error of the mean, so we use the above function calls, using value as the input. Run the ddply call, and we’re done!

ddply(melted, c("sex", "treatment", "variable"), summarise,
      mean = mean(value), sd = sd(value),
      sem = sd(value)/sqrt(length(value)))
  sex treatment  variable         mean        sd        sem
1   1         1 response1  0.021856280 1.0124371 0.04527757
2   1         1 response2  0.045928150 1.0151670 0.04539965
3   1         2 response1 -0.065017971 0.9825428 0.04394065
4   1         2 response2  0.011512867 0.9463053 0.04232006
5   2         1 response1 -0.005374208 1.0095468 0.04514830
6   2         1 response2 -0.051699624 1.0154782 0.04541357
7   2         2 response1  0.046622111 0.9848043 0.04404179
8   2         2 response2 -0.055257295 1.0134786 0.04532414

Using R: writing a table with odd lines (again)

Let’s look at my gff track headers again. Why not do it with plyr instead?

d_ply splits the data frame by the feature column and applies a nameless function that writes subsets to the file (and returns nothing, hence the ”_” in the name). This isn’t shorter or necessarily better, but it appeals to me.

library(plyr)
connection <- file("separate_tracks_2.gff", "w")
d_ply(gff, "feature", function(x) {
  writeLines(paste("track name=", x$feature[1], sep=""), connection)
  write.table(x, sep="\t", row.names=F, col.names=F,
              quote=F, file=connection)
})
close(connection)